Online appointments
Let patients book appointments themselves.Overview
With online appointments, you let patients book appointments in your practice's calendars themselves. You can configure this in detail to fit your situation and wishes.
Turn on online appointments
To open the general settings, go to Settings → Appointments: click the cog in the left menu and select Online appointments under Appointments.
Administrators can turn on and set up online appointments:
- Link
- User labels
- Appointment types
- Calendar range
- Patient information
- Notifications
- Redirects
- Availability
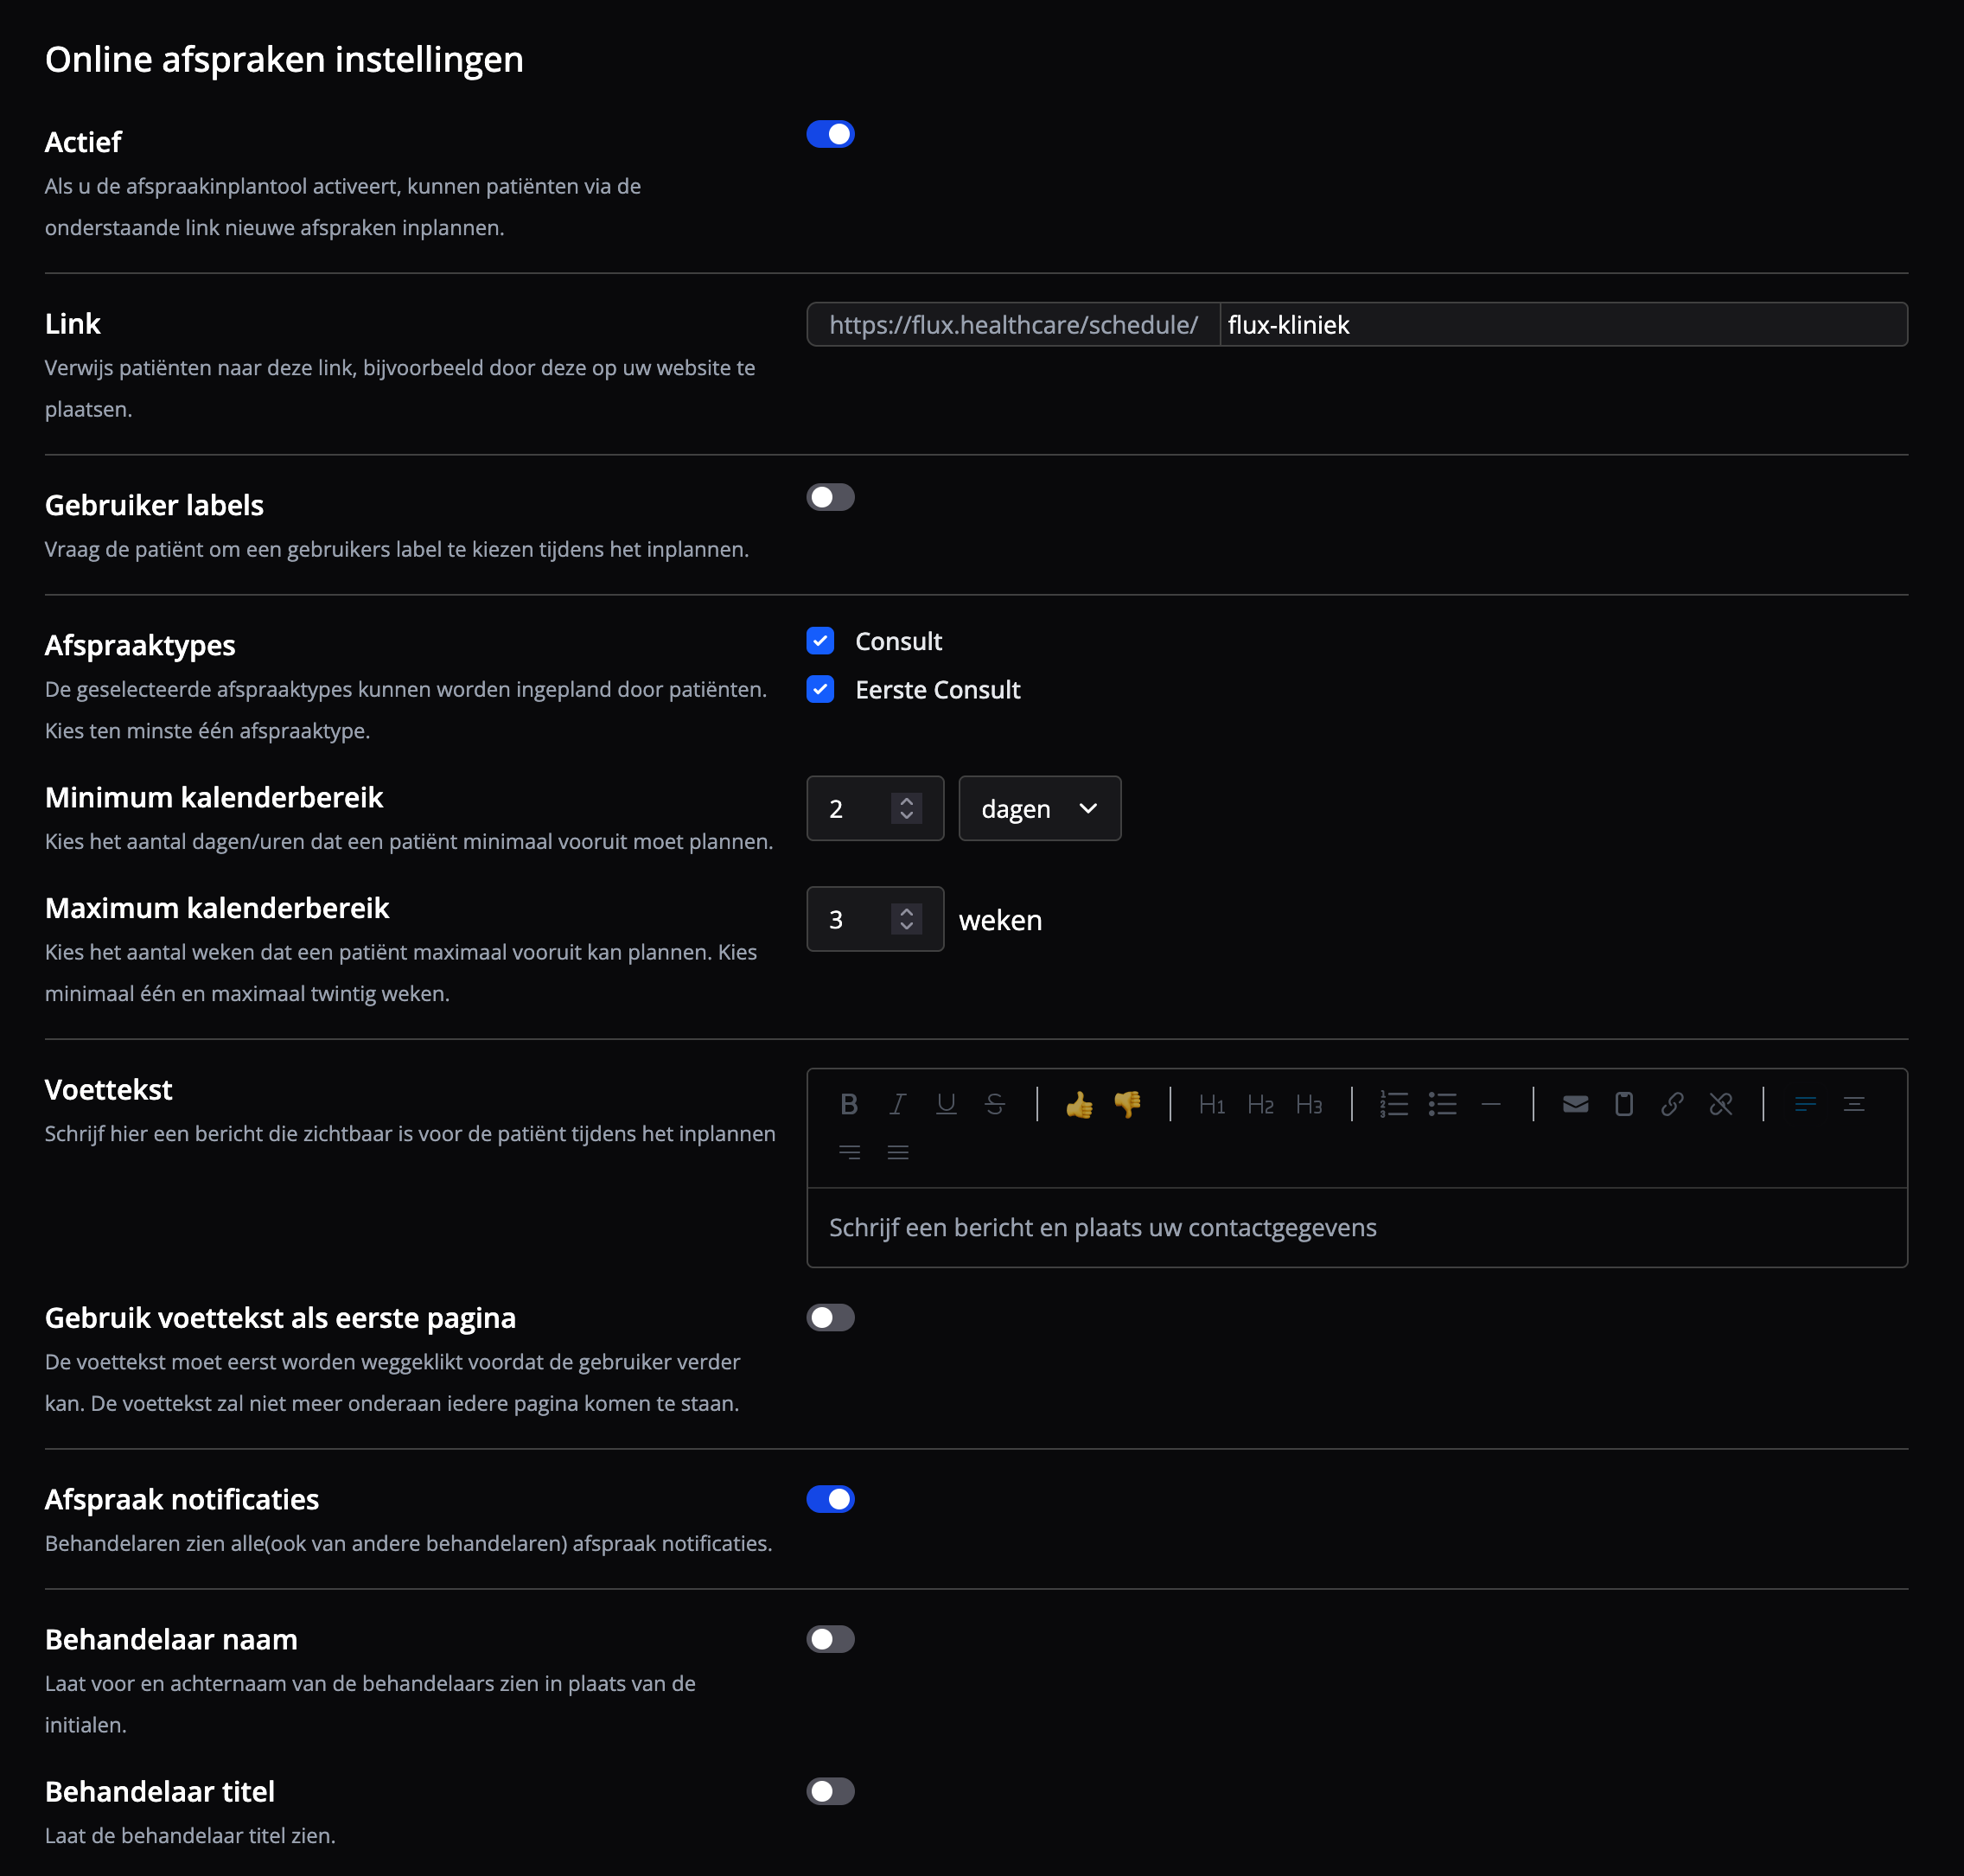
Turn on
Turn on online appointments with the switch. Once online appointments are on, patients can book new appointments through the link below.
Link
Send patients straight to the online planner with this link. You can share it by email, on your website, on WhatsApp, Instagram or other channels.
Set up online appointments
Online appointments has several settings, so you can match it closely to your practice.
User labels
With this setting, patients can choose from predefined labels, for example a specialism or target group. Patients only see active labels, so they quickly find the right practitioner.
Appointment types
The selected appointment types that patients can book. Patients only see the selected appointment types, so choose at least one for patients to book.
Minimum calendar range
Choose the minimum number of days and/or hours ahead that a patient can book. For example, with a setting of 24 hours, patients can only book appointments that start at least 24 hours later.
Maximum calendar range
Choose the maximum number of weeks ahead that a patient can book: at least one and at most twenty weeks.
Booking page footer
Write a message here that the patient sees when they start booking online. It appears as a pop-up that the patient closes to continue.
The text only shows at the start, not at the bottom of every page.
Appointment notifications
With this setting on, all practitioners can see and handle each other's appointment notifications.
Practitioner name
This setting shows the practitioner's full name, so patients know exactly who they are booking with.
Practitioner title
This setting shows the practitioner's job title, for example "Physiotherapist" or "Speech therapist", so patients know their specialism.
Redirect
With this setting, you decide which page a patient sees after booking an appointment. This can be a thank-you page or a page with practical instructions, for example.
After booking, the patient is sent to that link automatically.
Availability
With this setting on, the time slot is available for online booking straight away. With it off, the time slot is not available for online booking.
You set the availability of practitioners in the calendar.
Accept automatically
When the patient can be matched automatically, this setting accepts the appointment automatically. Package appointments are never accepted automatically.
Link builder
With the Link builder, you put together your own link for booking online appointments. You decide the order of the steps and can fill in some choices in advance, such as the appointment type or the location. Anything you don't set in advance, the patient chooses while booking.
The link works as soon as you generate it and follows your settings automatically. That makes it easy to create different links for specific situations.
URL parameters
When booking online, the patient goes through a few steps. Each step matches a parameter in the URL, which Flux uses to filter the available options:
appointment_type: the appointment typelocation: the locationuser_label: the user labeluser: the practitioner
Flux can fill in some choices in advance. Anything not filled in, the patient chooses while booking.
Cancel online appointments
You can include a cancellation link in an appointment's confirmation email. With this link, a patient can cancel the appointment themselves, without you having to do anything. After cancelling, the patient can book a new appointment straight away.
To open the settings, go to Settings → Cancellation links: click the cog in the left menu and select Cancellation links under Appointments.
Administrators can turn on and set up the cancellation link:
- Turn on Enable cancellation links
- Set until how many hours before the appointment patients can cancel
- Optionally, fill in the redirect link
- Click Save
Once you turn this on, the cancellation link is added to all new appointment confirmation emails automatically.
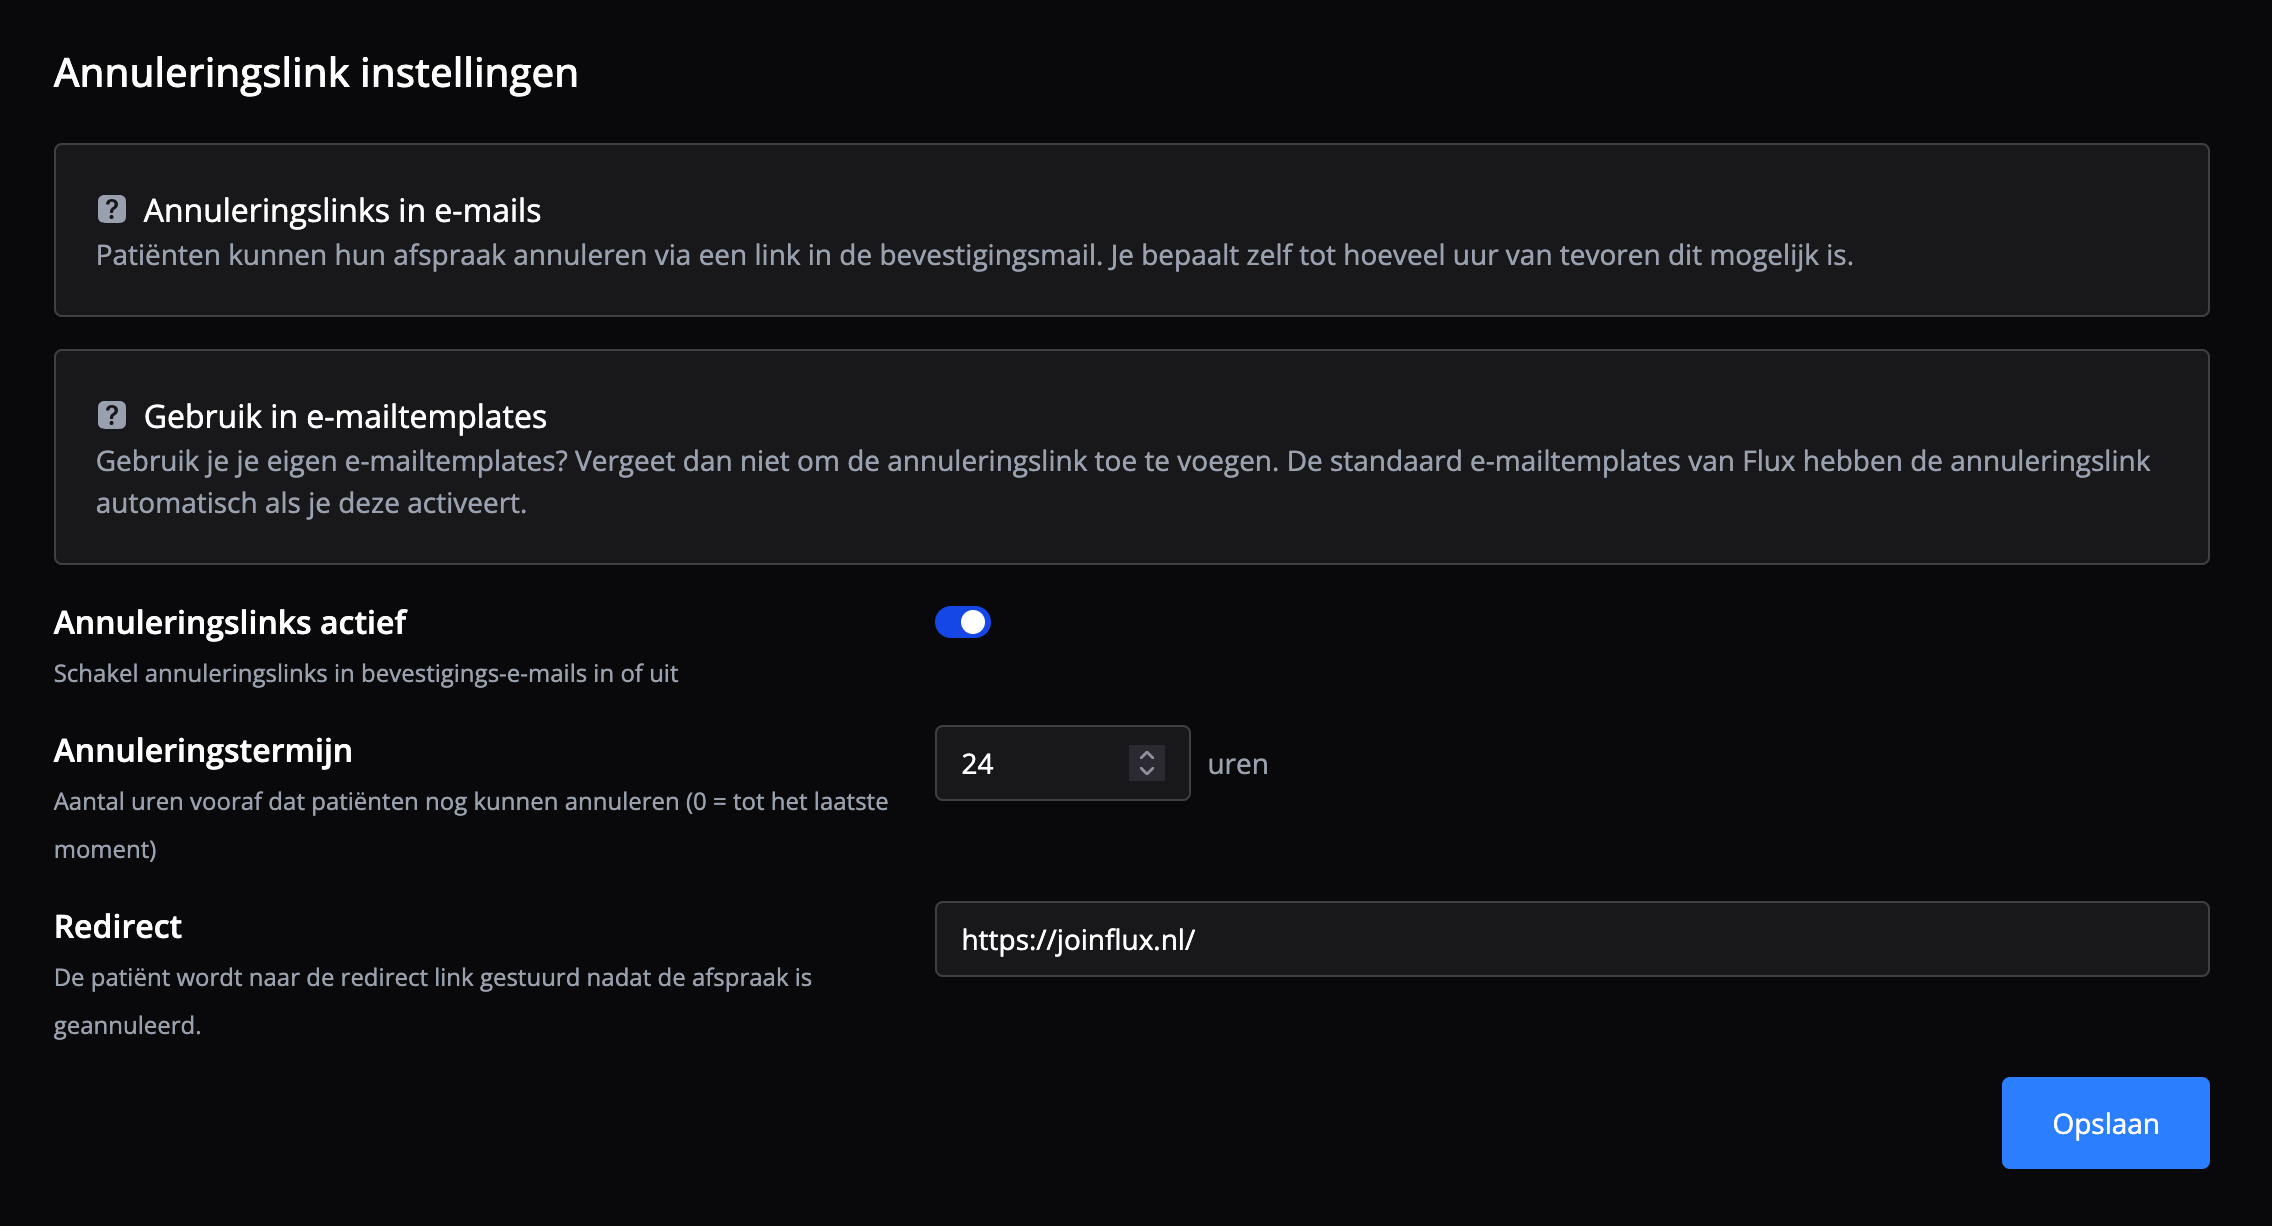
Turn on cancelling
Turn on the cancellation link with the switch. Once it is on, patients can cancel their existing appointments themselves through the cancellation link.
Notice period
You can set until how many hours before the appointment a patient can cancel, for example 24 or 48 hours in advance. This lets you balance flexibility for your patients against certainty in your schedule.
Redirect
With this setting, you decide which page a patient sees after cancelling an appointment. This can be a thank-you page or a page with practical instructions, for example. The patient is sent to this link automatically.
If you don't set a redirect link, the patient goes to the standard Flux page that confirms the cancellation. There, the patient can book a new appointment straight away in the online planner.